Descrizione
Velocizza il tuo sito web utilizzando il nostro ottimizzatore di immagini con WebP e AVIF. Sostituendo i file nei formati standard JPEG, PNG e GIF con i formati WebP e AVIF, puoi risparmiare oltre la metà del peso della pagina senza perdere qualità.
Dopo aver installato il plugin non è necessario fare altro. Le immagini attuali verranno convertite in un nuovo formato. Al termine dell’ottimizzazione delle immagini da parte del nostro ottimizzatore, gli utenti riceveranno automaticamente nuove immagini molto più leggere di quelle originali.
Ad oggi, oltre il 90% degli utenti utilizza browser che supportano il formato WebP. La velocità di caricamento del tuo sito web dipende in larga misura dal suo peso e dal livello di ottimizzazione delle immagini. Utilizzando il nostro WebP Converter, ora è possibile velocizzarlo in pochi secondi e senza grandi sforzi!
Questo sarà un vantaggio sia per gli utenti che non dovranno scaricare così tanti dati, sia per il server che sarà meno carico. Ti ricordiamo che un sito web meglio ottimizzato influisce anche sul suo posizionamento su Google. L’ottimizzazione delle immagini quindi è molto importante.
Supporta AVIF
Ora nella versione PRO è possibile utilizzare AVIF come formato di output per le immagini. Il formato AVIF è una nuova estensione e rappresenta il successore di WebP. Il formato AVIF consente di raggiungere livelli di compressione delle immagini ancora più elevati e la qualità delle immagini convertite dopo l’ottimizzazione delle immagini è migliore rispetto a WebP.
Come funziona?
- Se hai appena installato il plugin, puoi ottimizzare le immagini con un solo clic. Le dimensioni dell’immagine saranno più piccole dopo la generazione della webp!
- Le nuove immagini che verranno aggiunte alla libreria dei media verranno convertite automaticamente.
- Il nostro ottimizzatore di immagini non modifica in alcun modo le tue immagini originali. Questo significa sicurezza per te e per i tuoi file.
- Quando il browser carica un’immagine, il nostro plugin controlla se supporta il formato WebP. In caso affermativo, l’immagine in formato WebP viene caricata.
- Nella modalità predefinita, il plugin non effettua reindirizzamenti, quindi l’URL rimane sempre lo stesso. Solo il tipo MIME dell’immagine cambia in
image/webp. - Senza reindirizzamenti non ci sono problemi di cache e il funzionamento del tuo sito web è più veloce e senza problemi. Se vuoi saperne di più su come funziona, dai un’occhiata qui sotto FAQ del plugin .
- Non importa se l’immagine viene visualizzata come un tag HTML
imgo se usi unabackground-image. Funziona sempre! - Nel caso in cui la riscrittura tramite regole del file .htaccess sia bloccata, è disponibile una modalità che carica le immagini tramite il file PHP. In questo caso, gli URL delle immagini vengono modificati, ma la logica di funzionamento è la stessa della modalità predefinita.
- Il risultato finale dell’ottimizzazione delle immagini è che gli utenti scaricano meno della metà dei dati e il sito stesso si carica più velocemente!
- Non perdi nulla – se dovessi rimuovere il plugin, questo rimuoverà tutto da solo. Non lascia alcuna traccia, quindi è possibile controllarlo con facilità.
Convert WebP – è il futuro per l’ottimizzazione delle imagini!
Ottimizza le immagini e porta il tuo sito web a un nuovo livello! Installa il plugin e goditi un sito web che si carica più velocemente grazie all’ottimizzazione delle immagini. Sicuramente tu e i tuoi utenti lo apprezzerete.
Compatibilità con directory aggiuntive
Si possono convertire in formato WebP e ottimizzare le immagini non solo dalla directory /uploads ma anche dalle directory /plugins and /themes. In questo modo si ha una completa integrazione con il formato WebP!
Sostieni lo sviluppo del plugin
Trascorriamo ore a lavorare allo sviluppo di questo plugin. Anche il supporto tecnico richiede molto tempo, ma lo facciamo perché vogliamo offrirti il miglior plugin. Siamo contenti per ogni nuova installazione del plugin.
Se vuoi apprezzarlo, puoi provare la versione PRO. Inoltre, avrai accesso a funzionalità extra che ti permetteranno di ottenere risultati di ottimizzazione delle immagini ancora migliori.
Ti consigliamo di leggere anche le FAQ qui di seguito. Grazie per essere stato con noi!
Screenshot

General tab of the plugin settings 
Advanced tab of the plugin settings 
Bulk optimization of images 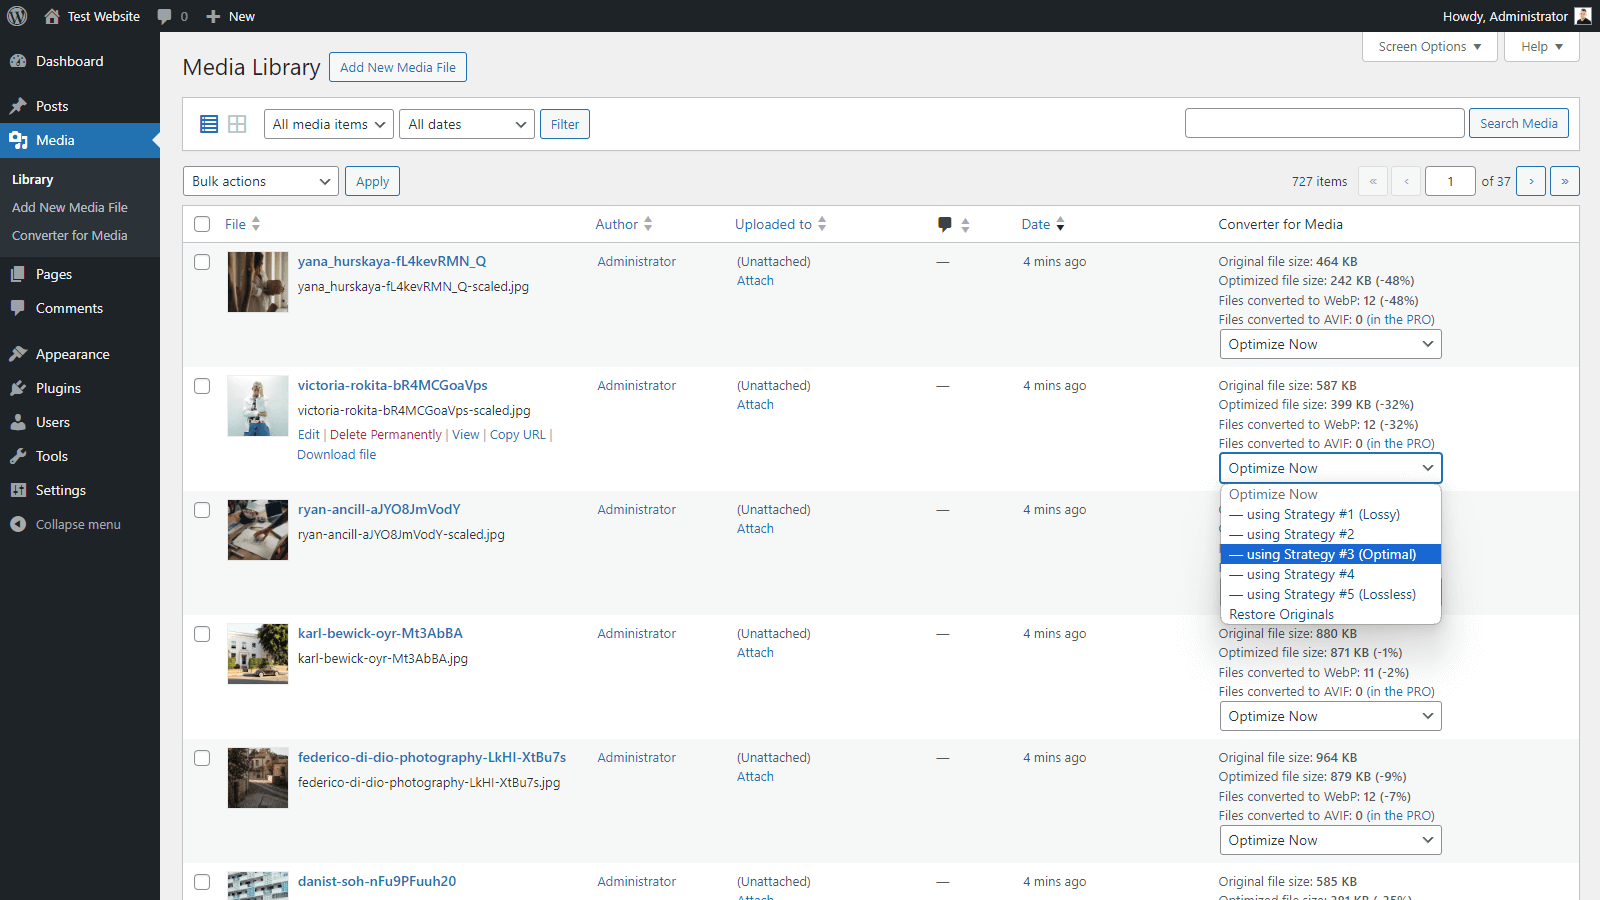
Optimization statistics of Media Library 
Ability to manually undo optimization of selected image
Installazione
- Upload the plugin files to the
/wp-content/plugins/webp-converter-for-mediadirectory, or install the plugin through the WordPress plugins screen directly. - Activate the plugin through the
Pluginsscreen in WordPress Admin Panel. - Use the
Settings -> Settings -> Converter for Mediascreen to configure the plugin. - Click on the
Start Bulk Optimizationbutton and wait. - Check if everything works fine using this tutorial.
That’s all! Your website is already loading faster!
FAQ
-
How to get technical support? (before you ask for help)
-
Before you add a new thread, read all other questions in this FAQ and other threads in the support forum first. Perhaps someone had a similar problem and it has been resolved.
When adding a thread, follow these steps and reply to each of them:
1. Do you have any errors on the plugin settings page? Please read this thread if you have any errors.
2. URL of your website.
3. Screenshot of the Help Center tab on the plugin settings screen – please take a screenshot of the ENTIRE page.
4. Please do the test, which is described in the FAQ in the question “How to check if the plugin works?”. Please send a screenshot of Devtools with the test results.
Please remember to include the answers to all questions by adding a thread. It is much easier and accelerates the solution of your problem.
-
Configuration for Nginx
-
If you are using a Nginx server that does not support .htaccess rules, additional Nginx server configuration is required for the plugin to work properly.
Please read this tutorial for more information.
-
Configuration for Nginx Proxy
-
If you are using a Nginx server that supports .htaccess rules, but you still have a server configuration error on the plugin settings page, additional Nginx server configuration is required for the plugin to work properly.
Please read this tutorial for more information.
-
Error on plugin settings screen?
-
If you have an error on the plugin settings screen, first of all, please read it carefully. They are displayed when there is a problem with the configuration of your server or website.
The messages are designed to reduce the number of support requests that are repeated. It saves your and our time. Please read this thread for more information.
-
Error while converting?
-
You can get several types of errors when converting. First of all, carefully read their content. For the most part, you can solve this problem yourself. Try to do this or contact the server administrator.
If you get an error:
File "%s" does not exist. Please check file path.means that the file_exists() function in PHP returnedfalseusing the file path given in the error message. Check this path and make sure it is correct.If you get an error:
File "%s" is unreadable. Please check file permissions.means that the is_readable() function in PHP returnedfalseusing the file path given in the error message. Check the permissions for the file and the directory in which the file is located.If you get an error:
"%s" is not a valid image file.means that the file is damaged in some way. Download the file to disk, save it again using any graphics program and add it again to the page. If the error applies to individual images then you can ignore it – just the original images will load, not WebP.If you get an error:
Image "%s" converted to .webp is larger than original and converted .webp file has been deleted.means the original image weighed less than WebP. This happens when images have been compressed before. Disable the “Automatic removal of files in output formats larger than original” option in plugin settings to force always using WebP. -
What are requirements of plugin?
-
Practically every hosting meets these requirements. You must use PHP at least 7.0 and have the
GDorImagickextension installed. The extension must supportWebP format. If you have an error saying that the GD or Imagick library is not installed, but you have it installed then they are probably incorrectly configured and do not have WebP support.They are required native PHP extensions, used among others by WordPress to generate thumbnails. Your server must also have the modules
mod_mime,mod_rewriteandmod_expiresenabled.An example of the correct server configuration can be found here. The link to your current configuration can be found in the Help Center tab on plugin settings screen.
Note the items marked in red. If the values marked in red do not appear in your case, it means that your server does not meet the technical requirements. Pay attention to the WebP Support value for the GD library and WEBP in the list of supported extensions for the Imagick library.
In a situation where your server does not meet the technical requirements, please contact your server Administrator. We are not able to help you. Please do not contact us about this matter, because this is a server configuration problem, not a plugin.
Also, REST API must be enabled and work without additional restrictions. If you have a problem with it, please contact the Developer who created your website. He should easily find the issue with the REST API not working.
-
How to check if the plugin works?
-
You can find more information on how the plugin works in our manual.
-
How to change the path to uploads?
-
This is possible using the following types of filters to change default paths. It is a solution for advanced users. If you are not, please skip this question.
Path to the root installation directory of WordPress (
ABSPATHby default):add_filter( 'webpc_site_root', function( $path ) { return ABSPATH; } );Paths to directories (relative to the root directory):
add_filter( 'webpc_dir_name', function( $path, $directory ) {
    switch ( $directory ) {
        case 'uploads':
            return 'wp-content/uploads';
        case 'webp':
            return 'wp-content/uploads-webpc';
        case 'plugins':
            return 'wp-content/plugins';
        case 'themes':
            return 'wp-content/themes';
    }
    return $path;
}, 10, 2 );
Note that the
/uploads-webpcdirectory must be at the same nesting level as the/uploads,/pluginsand/themesdirectories.Prefix in URL of
/wp-content/directory or equivalent (used in .htaccess):add_filter( 'webpc_htaccess_rewrite_path', function( $prefix ) { return '/'; } );For the following sample custom WordPress structure:
...
├── web
    ...
    ├── app
    │   ├── mu-plugins
    │   ├── plugins
    │   ├── themes
    │   └── uploads
    ├── wp-config.php
    ...
Use the following filters:
add_filter( 'webpc_site_root', function( $path ) {
    return 'C:/WAMP/www/project/web'; // your valid path to root
} );
add_filter( 'webpc_htaccess_rewrite_path', function( $prefix ) {
    return '/';
} );
add_filter( 'webpc_dir_name', function( $path, $directory ) {
    switch ( $directory ) {
        case 'uploads':
            return 'app/uploads';
        case 'webp':
            return 'app/uploads-webpc';
        case 'plugins':
            return 'app/plugins';
        case 'themes':
            return 'app/themes';
    }
    return $path;
}, 10, 2 );
After setting the filters go to
Settings -> Converter for Mediain the admin panel and click theSave Changesbutton..htaccessfiles with appropriate rules should be created in the directories/uploadsand/uploads-webpc. -
How to exclude paths from converting?
-
To exclude selected directories, use the following filter:
add_filter( 'webpc_supported_source_directory', function( bool $status, string $directory_name, string $server_path ): bool {
    $excluded_directories = [ 'my-directory' ];
    if ( in_array( $directory_name, $excluded_directories ) ) {
        return false;
    }
    return $status;
}, 10, 3 );
To exclude selected files use the following filter (in this case with the suffix “-skipwebp” in a filename, e.g. image-skipwebp.png):
add_filter( 'webpc_supported_source_file', function( bool $status, string $file_name, string $server_path ): bool {
    $excluded_suffix = '-skipwebp';
    if ( strpos( $file_name, $excluded_suffix . '.' ) !== false ) {
        return false;
    }
    return $status;
}, 10, 3 );
Argument
$server_pathis the absolute server path to a directory or file. Inside the filters, you can apply more complicated rules as needed.Filters run before images are converted – they no longer support converted images. You have to delete them manually if they should not be converted.
-
Support for custom directories
-
The plugin supports the following directories by default:
–/gallery
–/plugins
–/themes
–/uploadsIf you want to add support for a custom directory, add the following code to the functions.php file in your theme directory (use a correct directory name instead of
custom-directory):add_filter( 'webpc_source_directories', function ( $directories ) { $directories[] = 'custom-directory'; return $directories; } );Remember that this directory must be located in the
/wp-contentdirectory. -
How to run manually conversion?
-
By default, all images are converted when you click on the
Start Bulk Optimizationbutton. In addition, conversion is automatic when you add new files to your Media Library.Remember that our plugin takes into account images generated by WordPress. There are many plugins that generate, for example, images of a different size or in a different version.
If you would like to integrate with your plugin, which generates images by yourself, you can do it. Our plugin provides the possibility of this type of integration. This works for all images in the
/wp-contentdirectory.It is a solution for advanced users. If you would like to integrate with another plugin, it’s best to contact the author of that plugin and give him information about the actions available in our plugin. This will help you find a solution faster.
You can manually run converting selected files, you can use the action to which you will pass an array with a list of paths (they must be absolute server paths):
do_action( 'webpc_convert_paths', $paths, true );An alternative method is to manually start converting the selected attachment by passing the post ID from the Media Library. Remember to run this action after registering all image sizes (i.e. after running the
add_image_sizefunction):do_action( 'webpc_convert_attachment', $post_id, true );To delete manually converted files, use the following action, providing as an argument an array of absolute server paths to the files (this will delete manually converted files):
do_action( 'webpc_delete_paths', $paths ); -
Support for WP-CLI
-
The plugin supports WP-CLI, which enables faster image conversion from the server level. More information on how to get started with WP-CLI can be found in the Handbook. The supported commands are described below.
Checking how many maximum images for conversion are on website:
wp converter-for-media calculateConverting all images:
wp converter-for-media regenerateConverting all images (with “Force convert all images again” option):
wp converter-for-media regenerate --force -
Does plugin support CDN?
-
The website files (WordPress files) and the images from the Media Library must be on the same server. If they are, everything should work fine.
If only your images are on another CDN server, unfortunately correct operation is impossible, because such images are managed by another server.
Current list of supported CDN servers:
– BunnyCDN (refer to the instructions before use)
Recensioni
Contributi e sviluppo
“Converter for Media – Ottimizza le immagini | Converte le immagini in formato WebP e AVIF” è un software open source. Le persone che hanno contribuito allo sviluppo di questo plugin sono indicate di seguito.
Collaboratori“Converter for Media – Ottimizza le immagini | Converte le immagini in formato WebP e AVIF” è stato tradotto in 20 lingue. Grazie ai traduttori per i loro contributi.
Ti interessa lo sviluppo?
Esplora il codice segui il repository SVN, segui il log delle modifiche tramite RSS.
Changelog (registro delle modifiche)
5.12.5 (2024-04-15)
[Fixed]Modification of plugin settings via filters
5.12.4 (2024-04-12)
[Fixed]Support for changed upload directory path based on absolute path from upload_path option[Fixed]UX of plugin settings page[Changed]Error message for rewrites_not_executed error in server configuration
5.12.3 (2024-03-19)
[Fixed]Support for changed upload directory path based on upload_path option
5.12.2 (2024-03-14)
[Changed]Verification of rewrites_not_executed server configuration error[Added]Support for changed upload directory path based on upload_path option[Added]Support for WordPress 6.5
5.12.1 (2024-02-15)
[Fixed]Verification of rewrites_not_executed server configuration error when there is also a problem with the Gd or Imagick libraries[Changed]Error message for bypassing_apache error in server configuration[Added]Possibility to add directory paths in the Excluded directories field in Advanced Settings
5.12.0 (2024-01-18)
[Changed]Statistics about bulk optimization process[Added]Expert settings to overwrite paths for rewrite rules[Added]Improvement in verifying operation of redirections
5.11.5 (2023-12-07)
[Added]Compatibility with PHP 8.3[Changed]Error message for rewrites_not_executed error in server configuration[Changed]Error message for bypassing_apache error in server configuration
5.11.4 (2023-11-13)
[Fixed]Removing WebP files converted for AVIF format from /uploads-webpc directory after uninstalling plugin[Fixed]Statistics of conversion progress in WP-CLI[Changed]Error message for rewrites_not_executed error in server configuration[Changed]Error message for bypassing_apache error in server configuration[Changed]Error message for rewrites_cached error in server configuration
5.11.3 (2023-11-09)
[Fixed]Automatically conversion of images from /uploads directory, but not from Media Library[Added]Support for WordPress 6.4
5.11.2 (2023-10-16)
[Added]Button to expand/collapse list of directories to optimize in Bulk Optimization of Images section[Added]Notification about plugin requirements in WordPress Playground environment
5.11.1 (2023-10-02)
[Fixed]Duplicated rewrite rules for .jpeg files[Changed]Error message for rewrites_not_executed error in server configuration
5.11.0 (2023-09-27)
[Added]Ability to manually optimize selected images in Media Library[Added]Ability to manually undo optimization of selected images in Media Library
See changelog.txt for previous versions.